by
by In this tutorial, we will see how to root Nexus. In this Step by Step guide, I will show you how to use Nexus Root Toolkit by Wugfresh to safely and reliably root any Nexus device. I am writing this guide because I had recently tried rooting my LG Nexus 5 using one click King Root. King Root was successful in rooting the device but it messed up my battery indicator. I was able to solve my problem by unrooting and then again rerooting my phone using Nexus Root Toolkit. I hope this guide will help other in the search for a reliable and safe method to root their Nexus device.

Pros and Cons of One Click Root
Pros
- No PC Required
- Less Time Consuming
- Less Complicated
Cons
- Unreliable
- Uses Security Vulnerabilities
- Less Transparent
Why Use Nexus Root Toolkit?
- Uses no Security Vulnerabilities
- Simple Step by Step Process
- Highly Transparent about the operations being performed
- No need to input any command as it provides easy to use GUI
Things Required to Root Nexus
- USB Data Cable
- PC
- Nexus Root Toolkit
1. Download and Install Nexus Toolkit by Wugfresh
- Download Nexus Root Toolkit from here http://www.wugfresh.com/nrt/
- Double Click on downloaded EXE file to start the Installation.
- Select the installation location in then click on Install.
- Grant administrative rights if requested.
- After installation is finished open it.
2. Nexus Toolkit Updater Bug Fix
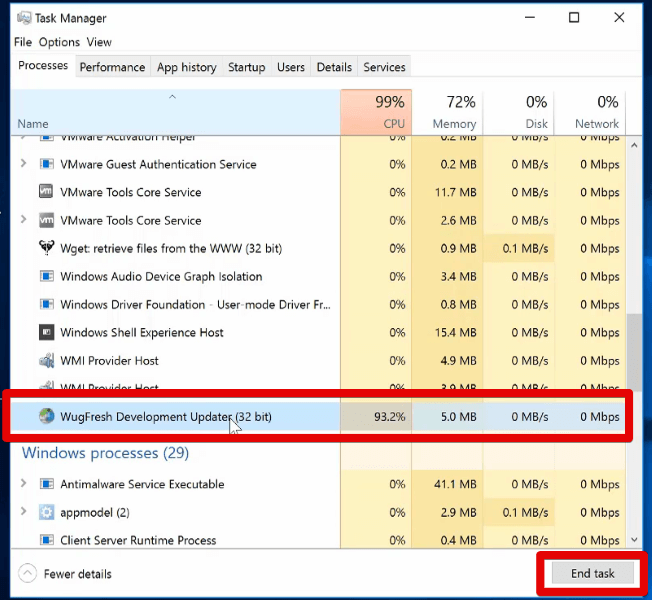
If the software does not open after 5 minutes follow the below steps:-
- Right Click on the taskbar.
- Click on task manager.
- Under the process tab search for “wugfresh development updater“.
- Select it and click on end task.
3. Finding Nexus Model and Build Number
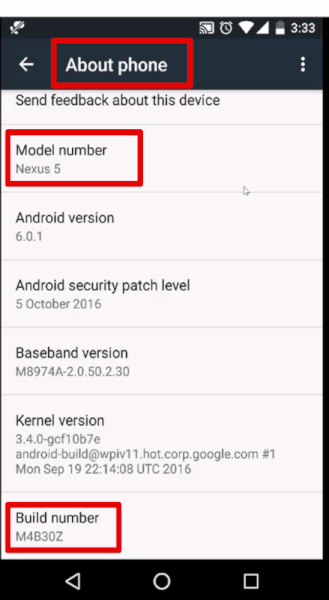
In your phone
- Go to settings by clicking on the gear icon.
- Scroll down tap on about phone in the system section.
- Note the mentioned model number and build number.
In your computer
- In the installed Nexus Root Toolkit software.
- Input your device model number in the device drop-down.
- In the select android build drop-down search and select your build number.
- If you cannot find your build number in the list select any build.
- Click Apply.
4. Enable USB Debugging in Nexus
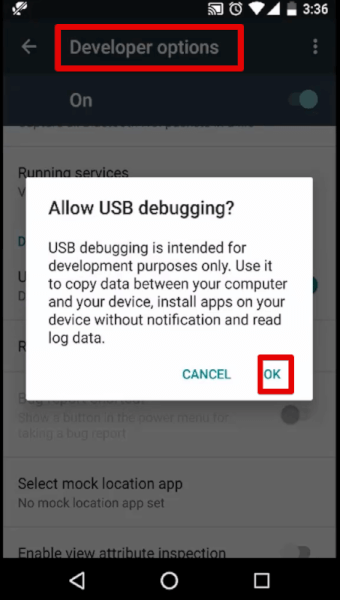
In your phone
- Enabling Developer options if already done skip this step.
- Go to settings by clicking on the gear icon.
- Scroll down tap on About phone in the system section.
- Tap on build number 4 to 5 times.
- A message should be displayed “you are now a developer“.
- Go to settings by clicking on the gear icon.
- Scroll down tap on Developer options in the system section.
- Scroll down in the debugging section turn on USB debugging.
5. Installing Nexus USB Drivers
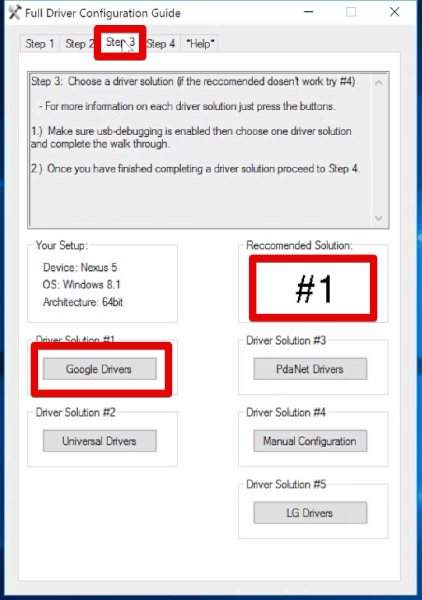
- In the installed Nexus Root Toolkit software.
- Click the “Full Driver Installation Guide ( Automatic + Manual) ” button in the initial setup.
- Uninstall any drivers for your phone installed previously .(if not skip)
- Follow the mentioned Step 1 & 2.
- Install new driver
- Open Step 3 tab.
- Note the recommended solution number #1 as mentioned.
- Click on the recommended driver solution # button.
- Perform the driver installation steps.
- Test your newly installed driver
- Open Step 4 tab.
- Connect your phone to the PC using USB Data Cable.
- Make sure you have enabled USB Debugging.
- In your phone check “Always allow from this computer” and click ok.
- Click on the “Full Driver Test” button.
- Wait till you see the “Successs!” message.
- Reboot the PC.
6. Updating TWRP and SuperSU
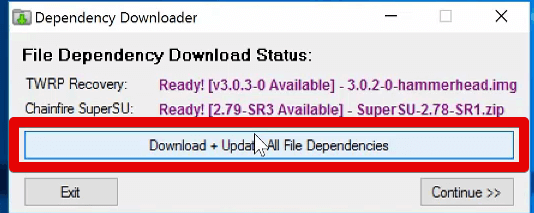
- Go to the installed Nexus Root Toolkit software.
- In Menu click on Update.
- Click on Automatic Update.
- Click on “Download + Update All File Dependencies“.
- If you receive NRT File incomplete/ hashcheck-mismatch notice click on Continue button.
- Open the download link in the browser and download the file.
- If the download link doesn’t google search the mentioned file name to get the download link.
- Once the file download is complete click on Browse and select the downloaded file.
- Click on Apply to import the downloaded file.
7. Backup User Downloaded Apps
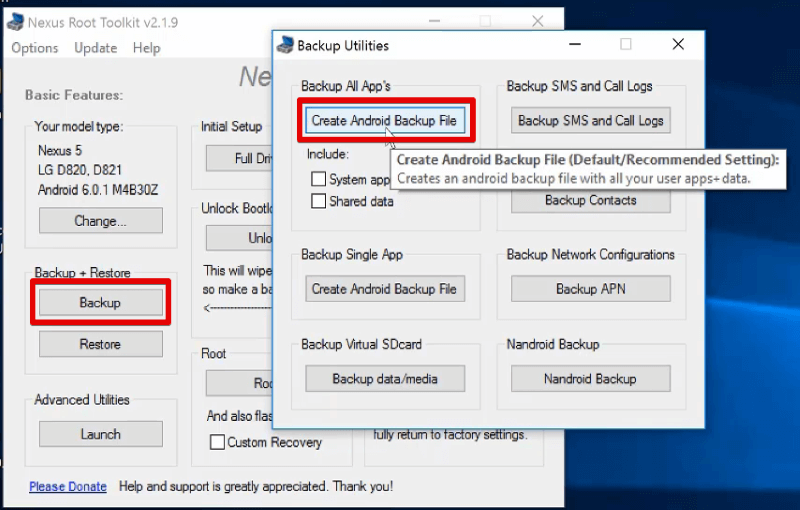
Note: This only backups user downloaded apps.
- In Nexus Root Toolkit software.
- Click the Backup button in the Backup + Restore section.
- Click on “Create Android Backup File” Button.
- Go through the instruction and after reading click OK.
- Select the location for saving the backup file.
- Type the file name and then click Save.
- Go through the instruction and after reading click OK.
- Encrypt the backup with a password enter it in the phone. (Optional)
- Tap on Backup my data in the phone.
- Click OK on the message indicating the backup has completed.
8. Manual Backup of Media Files
- Identify the media files you would like to backup.
- Copy the files to an SD card.
- Remove the SD card from the phone.
9. Unlocking Nexus Bootloader
Warning: Performing the below-mentioned step will completely wipe your phone to factory defaults. Only proceed after taking proper backup of your data.
- Using Nexus Root Toolkit software.
- Click Unlock button in the Unlock Bootloader section.
- Carefully read through the warning displayed if ready then only click OK.
- Your phone will reboot many times.
- Wait till you see a message indicating bootloader unlocked.
- Make sure USB debugging is enabled.
10. Root Nexus using Nexus Toolkit
- In the Nexus Root Toolkit software.
- If you want to install Custom Recovery check Custom Recovery in the Root section.
- Click on Root button in Root section.
- Go through the instruction and after reading click OK.
- Your phone will reboot many times.
- Wait till you see a message indicating rooting is finished.
- Click OK
11. BusyBox Root Privileges and Installation
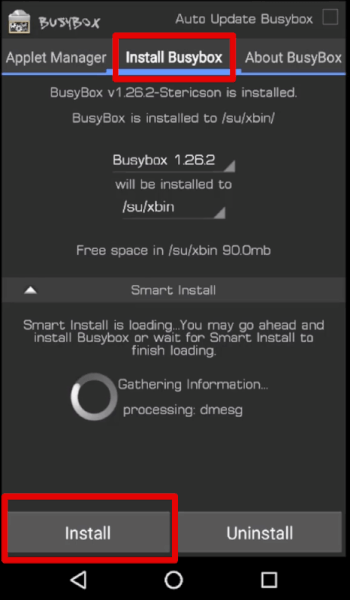
In your phone
- Open the BusyBox app.
- Grant the root privileges requested by BusyBox app.
- Tap open the Install BusyBox tab.
- Click on the Install button.
Now you should have a fully rooted nexus device. If you are facing any problem following this guide you can post your problem in this thread at our HowIoSolve Community Forum.
I hope this guide helped you. If yes, consider supporting us. You can also help us by sharing this guide with your friends whom you think could benefit from it.
At howisolve.com we provide you the with latest updates on technology, tutorials, tips and tricks, troubleshooting guides and much more. Subscribe to our newsletters to get regular updates straight to your inbox. Thanks for reading friends see you later bye.