by
by Have you recently upgraded to Windows 10 or are you planning to?
If yes, then this post will help you get the most out of your windows 10 system. In this post, you will see the new windows 10 features. Some nifty tips and tricks to boost your windows 10 experience and ease your transition from windows 7 to windows 10. So read on….

A Similar Experience: Cloud Sync
The Windows 10 boot screen has the new windows logo with the revamped boot animation. Microsoft has redesigned the look and feel of windows based on the principles of minimalist, clean and simple user interface. But there is more than a UI change in windows 10. Now Windows can also be cloud synced using the Microsoft account. This is like IOS or Android operating system and allows you to sync your settings in the cloud.
Let us now login to our system.
Back from the Dead: Start Menu
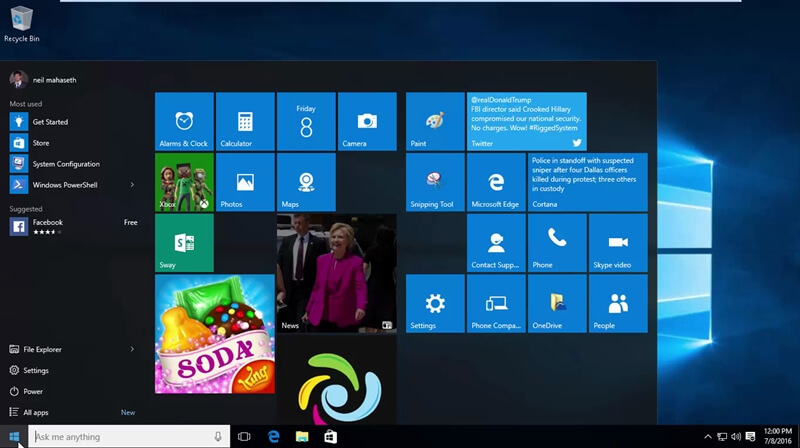
Unlike the Windows 8 which showed the start screen after login. In Windows 10 we login straight into the desktop environment just like Windows 7. Also, the start button has been restored. Let us click it this new start menu is a kind of mashup between the Windows 7 start menu and Windows 8 start screen.
But I feel it is even better than both of them because of the sheer amount of customization that Windows has allowed its users to make.
Not only we can resize the start menu.
Resize Start Menu
- Click on Start
- Click on the borders of the start menu
- Drag and leave your mouse to resize it
But we can change the tile size and switch from live ties to a static one.
Change Tile Size
- Click on Start
- Right Click on the Tile
- Select Resize
- Select the size small, medium, wide, large
It also allows us to completely remove a tile. If you do not want any of the tiles on your start menu, you can remove all the tile one by one. By removing all the tiles, it will look like the Windows 7 start menu.
Turn Live Tile on/off
- Click on Start
- Right Click on the Tile
- Select More
- Select Turn live tile on/off
Remove Tile
- Right Click on the Tile
- Select Unpin from Start
But that’s not all folks for those who like the windows 8 style start screen they can turn it on from the settings.
Turn on Windows 8 Type Start Screen
- Click on Start
- Click on Settings
- Click on Personalization
- Click on Start
- Click on the toggle button Use Start full screen
It looks like Microsoft has finally learned its lesson. It is best to leave the user the flexibility to choose from.
There is also some new functionality in the start menu.
Filter Applications Alphabetically
- Click on Start Button
- Click on Apps Button
- Click on any Alphabet shown in the heading
- In the dialog box show, Click on the alphabet that you want to scroll to.
A tip to improve your productivity.
Right-click on the start button to open the shortcut menu. Using this menu you can use those windows 10 features that were earlier present on the original Windows 7 start menu like Run, Search, Control Panel. But besides that it adds several commonly used system tools like the device manager, disk management, computer management. All of them, you can reach with just a single click. This feature is also available in Windows 8.1
An AI with a Personality: Cortana
The best attraction of Windows 10, in my opinion, is Cortana. Cortana unlike many other personal assistants like Siri, Google Now has a character of its own. From chatting with you, to telling you a joke, to singing for you. It will do everything with a human-like personality.
And what I mean by that can be seen clearly by these couple of commands. To give a voice command to Cortana click on this mic button on the taskbar next to the search box.
Say: Hey Siri
Cortana Replies: Shirley, you’re not siri-ous.
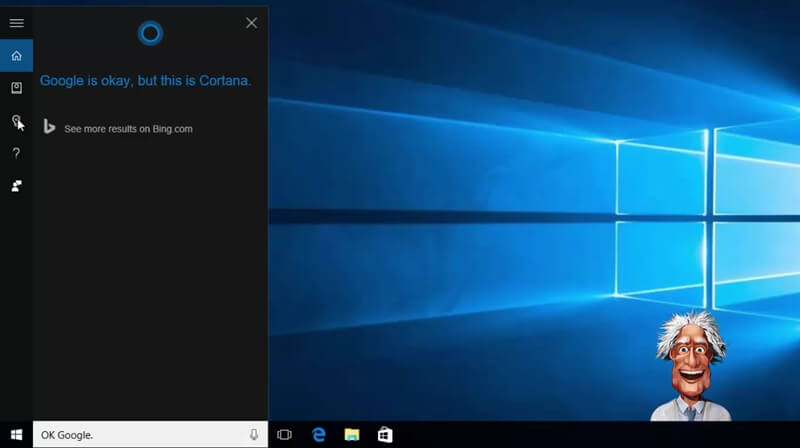
Say: Okay Google
Cortana Replies: Google is okay, but this is Cortana.
There are several other commands to which Cortana replies wittily. But don’t mistake it to be just as a source of entertainment. It can set your calendar, add reminders, set alarms, send an email, play your favorite music, get your directions for your next visit, tell facts, track your flights, give statistics and many other functions.
You can customize these to your interest using the notebook section. By clicking on the notebook icon. Not only that, using Cortana, you can run a voice-activated search. For example, say the following command “find a PowerPoint file that I created 2 days ago”. Cortana will try to search your computer for a PowerPoint file that was created 2 days ago.
A Small Change: File Explorer
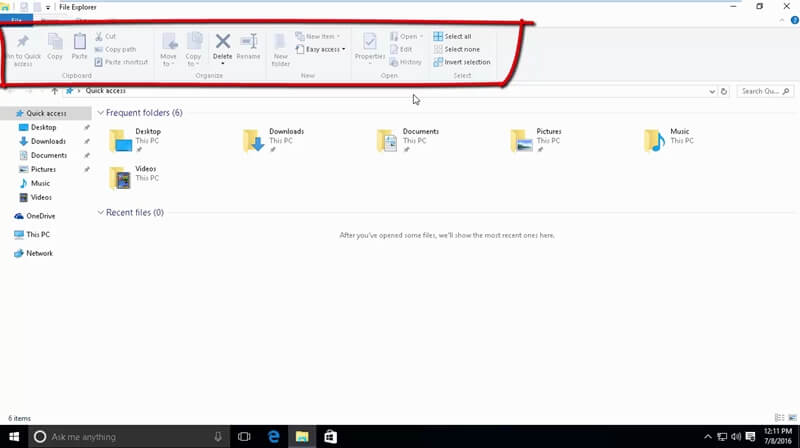
Now let’s look at the file explore. The file explorer has not changed much except a ribbon menu has been added to the top section. This is like the Office ribbon menu using it you can copy, paste, create a new folder, check the properties, and other windows 10 features. These features were available in Windows 7 by right-clicking and on the top menu.
A Complete MultiTasker: Snap Assist and Virtual Desktop
Snap Assist
Just like Windows 7, Windows 10 also provides side-by-side window placement functionality. So if you have got more than two windows open. You can drag a window to one corner of your screen and it will automatically resize it so that it fit on the half part of the screen.
Not only the Windows sticks to the side, but also it provides a suggestion to fix other Windows. Also now you can fix four Windows to a single screen. For that, you drag a window to the corner of the screen and now it will automatically resize to one-fourth of the screen.
Virtual Desktop
To further improve your multitasking experience. Windows now packs in the virtual desktops. Now you can open many windows on different virtual desktops and switch between them. This provides a great way to cut the clutter.
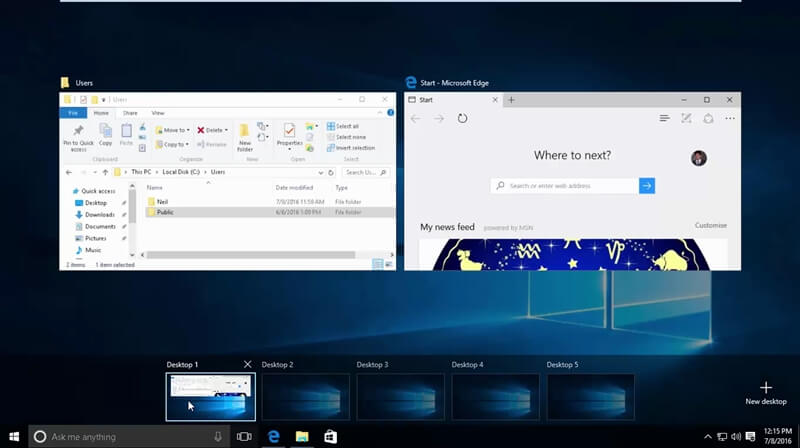
To create a new virtual desktop, click on this icon on the taskbar it is called task view. On clicking it you will see the currently available desktops. In the bottom section you can see there are two desktops available desktop 1 and desktop 2.
To add a new desktop, click on this plus sign that you can see at the right-hand corner labeled new desktop. To switch to a particular desktop. Just bring your mouse over that desktop and click on it. Here you go you get a new desktop without all the windows that were present on the previous one.
Much More Powerful: Task Manager
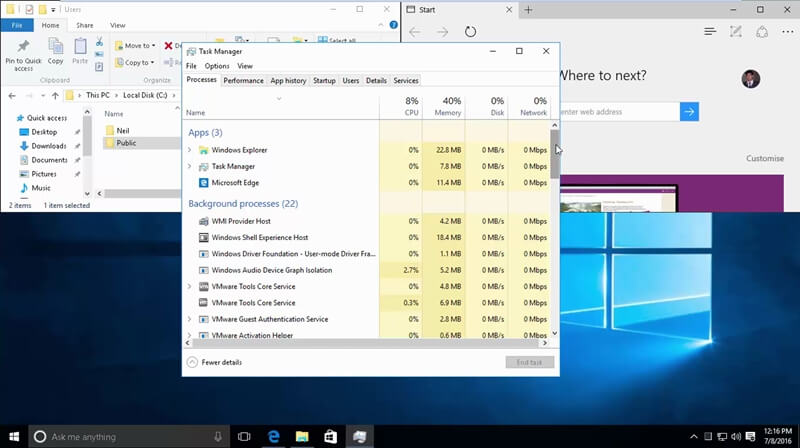
The task manager has also undergone a significant upgrade. To open the task manager, right-click on the taskbar and select task manager. This is the new task manager as you can see in the process tab now it categorizes the process in three different types. That is apps background process and windows process.
In the app history tab, you can track the resources used by an app since a particular date. Also, you can check what all programs are configured to run on startup by clicking on the startup tab. If you don’t like the new look of the task manager. You can see the Windows 7 style task manager by clicking on the details tab.
Apps On PC: Windows Store
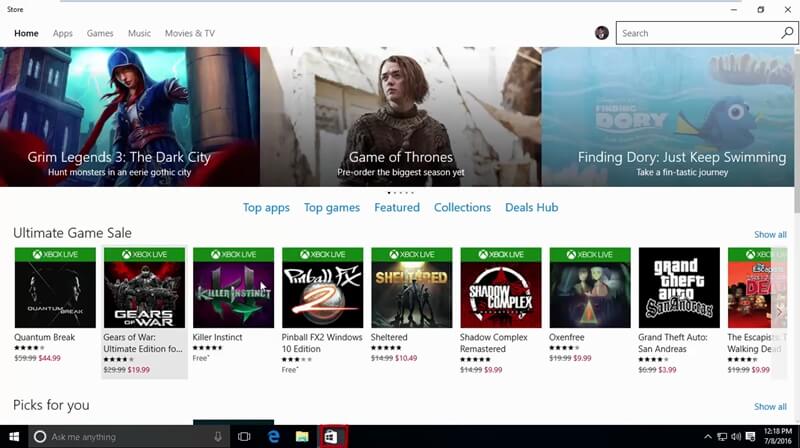
The single biggest change to Windows is the addition of apps. Now just like the PlayStore in Android and App Store in IOS, Windows has added the Windows Store to manage your apps. You can open the Windows store by clicking on this icon on the taskbar.
The number of apps that are currently available in the Windows store is less compared to Android or IOS. However, you can find some popular apps. Like Facebook, Candy Crush and Netflix and its improving day by day.
A New Beginning: Microsoft Edge
Finally, Microsoft has ditched Internet Explorer to start from scratch with the edge browser. You can open it by clicking on this icon on the taskbar. The windows 10 features of the edge browser are not up to the mark with the likes of Chrome or Firefox. In fact, it is not fully developed and so Microsoft has kept internet explorer as a backup option.
Open Internet Explore
- Click on the three dots icon shown at the top right corner of the edge browser
- In the menu, select Open with Internet Explore
There are a couple of unique windows 10 features like the on-page annotation. This allows you to quickly add a comment, highlight, and markups to any web page and share it instantaneously with anyone. Let us check that feature out.
Add Annotation in Microsoft Edge
- Browse to the site you want to annotate
- Click on the third icon from the right in top menu shown in Edge Browser labeled make a web note
- You can use a pen, highlighter, add a comment, crop a screen and erase any changes made
- Click on the appropriate icon shown in the top left corner of the screen
- To Save click on the save icon shown on the top right corner.
- To Share click on the share icon shown on the top right corner.
Read View in Microsoft Edge
One more cool functionality that the edge browser has inbuilt is the read view functionality. To activate the read view, click on this book icon that you can see on the address bar. As you can see it just trimmed down all the other cluttering items on the page. Kept only the article that you were reading. This feature is also available in other browsers.
A Mobile Experience: Notification & Actions Panel

Notifications
One more new feature added to Windows 10 is the notification and action Center. Click on the bottom right corner on this icon to open it. The notifications and action Center not only have the notifications that were originally seen on Windows 7. Like that of the maintenance or any error related or update reminders.
But now you can also have email alerts and any custom alerts generated by a Windows app. In my system as you can see in the above screenshot. I have got an email alert, an alert from Cortana app that I had installed on my android phone. This is a neat feature it automatically transfers notification from my phone to my windows system. There are some tips. There is a security and maintenance alert. This feature is again like what is present in android and IOS.
Toggle Buttons
On the bottom, there are a couple of toggle buttons.
Tablet Mode Button
The tablet mode, when switched on, makes all the apps full screen and instead of the desktop we see the start screen. Let’s toggle it on and here you go. Now we are in touch-optimized environment. This feature is particularly useful if you have a convertible system. Which when you remove your keyboard, will automatically convert to this tablet mode.
I believe this feature is the best way to bring the best of both worlds. Allowing your system to perform both as a tablet as well as a personal computer.
Rotation Lock Button
The next toggle button is this rotation lock. This allows you to fix your orientation or keep it on auto rotate. This is relevant if you are using a tablet.
Note Button
The note button allows you to open the Microsoft’s one note software.
Project Toggle Button
There is a project toggle button which allows your computer to share your display to a projector or other monitors connected.
Quite Hours Toggle Button
The quite hours toggle button silence the notification center so that you won’t be distracted between the time period of 12 AM to 6 AM.
Connect Toggle Button
The connect button allows you to connect a wireless display and audio devices that are supported by Windows 10. On switching it on it tries to search if there are any devices available on the same network.
VPN Toggle Button
If you have a VPN connection you can activate it using the VPN toggle button.
Location Toggle Button
The location button allows you to switch on and off Windows location tracking feature.
Wi-Fi and Bluetooth Toggle Button
If your system has Wi-Fi or Bluetooth then from here you can toggle them also on and off.
Settings Button
The settings button allows you to open up the all-new Windows 10 settings panel. I will open it up.
A Mini Control Panel: Settings Panel

This new settings panel tries to bring all the settings at a single place that were before available in separate menus in Windows 7. It is kind of mini Control Panel. The old menus are still present in Windows 10 but it has been hidden down within the settings panel.
System Settings
Let us look at the first setting that is the system settings. Under this, the display and power & sleep settings are the ones which are quite like what we had in Windows 7
Display Settings
The display allows us to change the orientation, brightness, text size and other advanced display settings.
Power and Sleep Settings
While the power and sleep change the idle times for your computer to go to sleep and to turning off the display.
Notification and Action Settings
The notification and action settings allow us to customize the notification panel as well as the taskbar.
It allows us to select which icons should appear on that taskbar and which notification should be shown on the notification and actions panel. Again, here Windows provides a lot of customization of the user experience which is quite helpful.
Apps and Features Settings
The apps and features section is kind of the program and features dialogue that was present in Windows 7 Control Panel. The only difference is that this allows us only to uninstall apps and not the desktop applications. You can also add or remove some optional features by clicking on manage optional features
Multitasking Settings
The multitasking settings allow us to customize the behavior of auto snap in and virtual desktop functionality.
Tablet Mode Settings
Tablet mode allows you to configure how the Windows should behave when you toggle to tablet mode.
Storage Setting
The storage setting shows the current disk consumption of your Windows system. It also allows you to change the default location for saving your apps, documents, videos, music and pictures.
One tip if you wish to separate your personal files from windows system drive you can change the storage drive in this settings panel.
Offline Map Setting
Off-line map section provides a new feature of saving Bing maps on your computer
Default App Settings
Default app settings allow you to select apps for common functionalities like email, maps, music player, photo browser, video player and web browser.
A handy tip if you wish to change the default browser to, let us say to chrome you’ll have to change it from this settings panel.
About Panel
The about panel gives us the system information you can view the previous menu that was visible in Windows 7 by clicking on system info over here. Now let us go back
Device Settings
The device settings give the option to add common hardware components like a printer, scanner, monitors, Speaker, and microphone. It is kind of trimmed down version of device manager, which is still available in the Control Panel.
Network and Internet Settings
The network and Internet settings panel give an easy interface for changing a couple of settings like proxy, VPN, Ethernet settings and adding a new internet connection.
A neat trick to keep track of your data consumption you can check the data usage section here.
Personalization Settings
The personalization settings screen provides configuration options for the background, lock screen, themes and the start menu.
A quick tip if you don’t like the default windows 10 dark theme color. You can change it to any other color by changing the accent color. That can be done by clicking on colors and changing it to any other color let say reddish color now as you can see the entire system changed its color.
Accounts Settings
The accounts section in the settings panel provides the options to change the Microsoft Account to which you want to sync. You can add or change the account using this settings section.
Time and Language Settings
Time and language give options to change your date and time settings as well as the region and language settings. Plus, it allows you to change your microphone and speech configurations settings
Ease of Access Settings
The ease of access settings provides accessibility settings for Windows 10. You can change the options for narration, magnification, high contrast, keyboard, mouse and closed caption.
Privacy Settings
Under the privacy settings, there is a ton of options Unlike Windows 7 Windows 10 collects a lot of data. This data is used by third-party apps and Microsoft for performance improvement and feature development. The amount of data that you want to share can be controlled by using this privacy setting.
You can toggle off sharing of data about your location, camera, microphone, speech, typing, contacts, calendar, account information, email, messaging, feedback, diagnostic, device information, and other general settings.
A tip to boost the windows startup time. In the background app settings section, you can toggle off those apps that you are not using.
Update and Security Settings
In the Update and Security section, you can control your Windows Updates, Windows Defender, Backup and Recovery and Windows Activation related settings.
I hope this post helped you in easing your transition from Windows 7 to Windows 10. Be part of our growing community if you love to use technology and have a passion for helping others join us. At howisolve.com we provide you the latest updates on the technology, tutorials, tips and tricks, troubleshooting guides and much more. Subscribe to our newsletter to get regular updates. Thanks reading friends. See you later bye.